Monday 28 April 2014

DIY Gel Nails : Sally Hansen Salon Gel Polish Feat. 'Cherry,Cherry, Bang, Bang'

Sick of spending $50 on a shellac or gel mani at the nail salon, me too! So when Priceline were having 20% Sally Hansen yesterday I decided to pick up a few colours as well as the base and top coats to try and DIY myself a salon quality gel mani at home.... 

Before the tutorial here are a few tips and tricks:

- If you cannot 'colour within the lines' (thank you Carrie Bradshaw SATC quote which i will not apologise for) and you are quite messy when painting your nails with regular polish then this is not for you.

- I did already had an LED Lamp of a different brand. After much google research, I found there are different LED lamps for gel and shellac. This lamp is for gel, it has a different watt to a shellac curing lamp. Just google it if you are using a different brand lamp to the gel polish you are applying.

- Pick a colour which is going to go with a weeks worth of outfits and occasions!

Sally Hansen Gel Base and Top Coat $19.95/4ml & Sally Hansen Gel Nail Colour $19.95/7ml available from www.priceline.com 

What you will need:
1. Nail clippers
2. Nail file
3. Orange Stick
4. Nail Buffer
5. Sally Hansen Salon Gel Polish - Base Coat - Step 1
6. Sally Hansen Salon Gel Polish - Nail Colour - Step 2
7. Sally Hansen Salon Gel Polish - Top Coat - Step 3
8. LED curing light

Step 1:
The best way to make an at home gel mani to last is to give your nails a good prep; trim and dead skin, file, buff and push your cuticles back with an orange stick.

*Tip : It is easiest if you complete all steps to one hand at a time but only fingers, complete thumbs together (see photo below) this is the fastest method of at home gels and safest in terms of screwing up uncured nails.*

Step 2:
With clean prepped nails it is time for the gel base coat, paint a thin layer of the base coat and cure under the LED lamp for 30seconds.

Step 3.
Time for the colour, like a traditional nail polish this will 2 two coats. Paint on a thin layer for the first coat, then cure under the LED lamp for 30seconds. For the second coat, even out the opacity and also make sure to cover the tip of the nail completely, this will seal the nail then cure under the LED lamp for 30seconds again.....repetitive sorry.

Step 4.

Top coat time, when applying the top coat make sure you go all the way to the edges of the nail, if you go onto the skin use the orange stick to scrape it off before curing and for the final time cure under the LED lamp for 30seconds.

Step 5.

Nails will feel sticky, they are not wet it is residue from the process, on a cotton round soaked with rubbing alcohol wipe the nails till they feel glossy and smooth!

Final thoughts:
My Sally Hansen Gel Polish mani lasted for approximately 1 week, with 2 nails completely peeling off which I thought was a fair amount of time even though on the box it claims to last for 2 weeks. Having tried a few other at home gel polish brands and they have been rubbish compared to the Sally Hansen Gel Polishes, the consistency was thicker and felt tacky when trying to apply more than one layer, they were also far more expensive. The colour selection of the Sally Hansen Gel polishes is quite limited at the moment but I'm hoping in time the shade range will be increased as this is now my go-to at home gel mani brand of choice.
The colour is bangin'! It is a grown up grape with a muted pastel cherry vibe in some lights, perfect for the cooler weather.

xxx Nella

Twitter @beautegazette
Instagram @beautegazette
Google +  +Nella van veenendaal 
Bloglovin' HERE
TUMBLR HERE


Wednesday 23 April 2014

Goldwell Kerasilk Keratin Care Review.....The Goldwell goose laid some very amazin' golden eggs with this new range

Goldwell Kerasilk Ultra Rich Keratin Care Oil $32.96 available exclusively in Goldwell Salons.

Goldwell's Kerasilk range was recommended to for me to try by my colourist a while ago and never got around to trying it, then I was kindly sent some PR samples to try out. Oh my goodness......pause for full on gasping praise..... I freakin' love this range so much. It is hard to single out a favourite product because they are all working wonders on my hair. So here are my thoughts on the range, prepare yourself for some very technical hair terms like 'this is the shiz'.....

Goldwell Kerasilk Ultra Rich Kertain Care Oil:
After I towel dry my hair after the shower it is in a state which is mortifying embarrassing a matted knotty mess of a mop. It is too painful and difficult to brush through without the aid of some sort of oil or detangler rubbed through my hair and finger combed out before attacking it with my Mason Pearson. 
2 pumps of Kerasilk oil and my brush glides through, it also gives my hair some weight and definition when it dries which for fine hair is just what it needs. I've also used it on my friend Alice's dry very curly coarse hair and it is wonderful for curl definition. There is also a Kerasilk Conditioning Spray which I am totally going to pick up to feed my new obsession.

Goldwell Rich Keratin Care Shampoo $29.95 & Rich Keratin Care Daily Mask $29.95 available exclusively in Goldwell Salons.

Goldwell Rich Keratin Care Shampoo & Daily Mask: 
Having a fringe and fine hair which gets oily quite quickly means I use a massive amount of dry shampoo to give body and dry up oil. So I need my shampoo to clean my hair and scalp getting rid of product build up without leaving it feeling steal wool. The Rich Keratin Care Shampoo does both of these things and then some, it feels like it cleans every strand without a foam party happening on my scalp, leaving eyes soap free. Last week whilst enjoying a hot shower the hot water ran out (insert emjoi face with smoke blowing out its nose) post shampoo - pre conditioning. It was too cold to condition so I just skipped it, fearful I would have to wear a hat to hide the state of my hair. But it was fine, the shampoo was conditioning enough it wasn't a total disaster and looked great. 
Now I'm not sure if you're meant to use the Rich Keratin Care Daily Mask as a conditioner but I have been, such a beauty rule breakin' rebel. Wowerz this stuff is the shiz! It leaves my hair feeling like silk without leaving any trace of product, it is totally weightless. If you are going to splurge on one item from the range then go for the Daily Mask it is a holy grail game changer for my hair care routine.

Now after testing this amazing range from Goldwell I am hoping my hair will be slightly resembling Blake Lively's lucious locks in like maybe a week or so, right? Oh my god....look at that hair! So not fair. 


xxx Nella

Twitter @beautegazette
Instagram @beautegazette
Google +  +Nella van veenendaal 
Bloglovin' HERE
TUMBLR HERE

Tuesday 15 April 2014

Beauté Gazette loves Swisspers Large Make-up Pads!

Swisspers Large Make-up Pads $4.05 available from www.woolworth.com.au

The motto 'Go Big Or Go Home' applies to a lot of things in my life....but my latest big love has been the Swisspers Large Make-up Pads. Seriously why haven't these been available sooner? Or am I just really late to the band waggon on this one?
The large make-up pads make it so much easier to take make up off, rather than wasting precious youtube watching time loading up about 5 smaller pads with Bioderma trying to get my mascara off. So less time and less product, this is obviously a win-win on all fronts.
This is a short and sweet post because there is not much more I can say on the subject of cotton rounds expect do yourself a favour, treat you self and UP SIZE next time you are in the need for some make-up pads. That's all. 


xxx Nella

Twitter @beautegazette
Instagram @beautegazette
Google +  +Nella van veenendaal 
Bloglovin' HERE
TUMBLR HERE

Monday 14 April 2014

John Frieda Colour Renew Tone Correcting Mouse....A texture secret weapon for fine hair!


John Frieda Colour Renew Tone Correcting Mousse $10.00 available from www.priceline.com.au

Please make welcome a new addition the Beauté Gazette family....my brand spankin' new Bangs!
Yes that's right, after not much careful consideration I decided pretty much on a whim to get a full on fringe, I know that's not what you are meant to do. But on a spare of the moment 'Wah I need a big change' moment I decided to give my forehead an accessory, in doing this my whole hair routine has changed. Prior my split ends were so bad they were actually acting as a natural texturizer....eewww so gross!
My routine now as I am with fringe is still very simple but I've added a few little va-va-voom extra steps to give my super fine hair a boost and texturize like no other.
1. Shampoo and Condition in the shower everyday, because I love clean hair. At the moment I'm using John Frieda Sheer Blonde Highlight Activating Moisturising Shampoo and Conditioner.
2. Whist hair is still damp add a few drops of hair oil Aveda Dry Remedy Daily Moisturising Oilthrough to help de-tangle, brush through with my trusty Mason Pearson Bristle and Nylon brush.
3. Time for my secret texture weapon John Frieda's Colour Renew Tone Correcting Mousse, shake the can and apply mousse, I focus on the roots massaging the mousse in with my finger tips.
4. Blow dry, holding the hairdryer in a downwards motion, brushing through sporadically (I hope not sporadically! - RIP Britney Murphy) to eliminate any knots.
5. Whist hair is still warm twist into a firm bun and pin with a bobby-pin, using a bobby-pin leaves no kinks or marks. 
6. I'm still getting used to styling my bangs, I use my straightener to help it sit just so and avoid too many flicky bits.
7. Take a 20min make up break, keeping the bun in for as long as I can before having to run out the door, usually 10 more minutes. The mousse helps hold the wave formed by the bun and is fair less damaging than heat styling waves into your hair.

TA-DA! Here is my new fringe and my new everyday textured tousled hair look, the mousse gives texture and hold without the grit and product build up of spray in or powder products.

xxx Nella

Twitter @beautegazette
Instagram @beautegazette
Google +  +Nella van veenendaal 
Bloglovin' HERE
TUMBLR HERE

Rimmel BB Cream Matte : Review and Swatches

Rimmel BB Cream Matte $12.95 available from www.priceline.com.au

Rimmel has finally got on board the already packed train of BB creams with it's latest release the Rimmel BB Cream Matte. Like all western BB creams it is not a traditional BB Korean cream, it is a sheer coverage tinted moisturiser which is very buildable. The consistency of the product when squeezed from the tube is very runny, and you have to work with it straight away otherwise it goes everywhere. On the plus side a little goes a long way and it is easily worked into your skin with fingers or a brush. If I am having a lazy day one layer applied quickly with my fingers does the job but if I need a more even and perfected 2 layers is best. I also found the more you build up the product the more mattifying it becomes, a great trick is to apply 2 layers in your more oil prone t-zone areas. A slight warning do not travel with it without putting it in a secure zip lock bag, the lid is not very secure  and I had a major leakage which completely ruined and stained my favourite make up bag. :(  
But for the price it is an amazing product and I would completely recommend it for teenagers needing a light base or if you just need a cheapie no-fuss foundation for applying quickly in the morning.


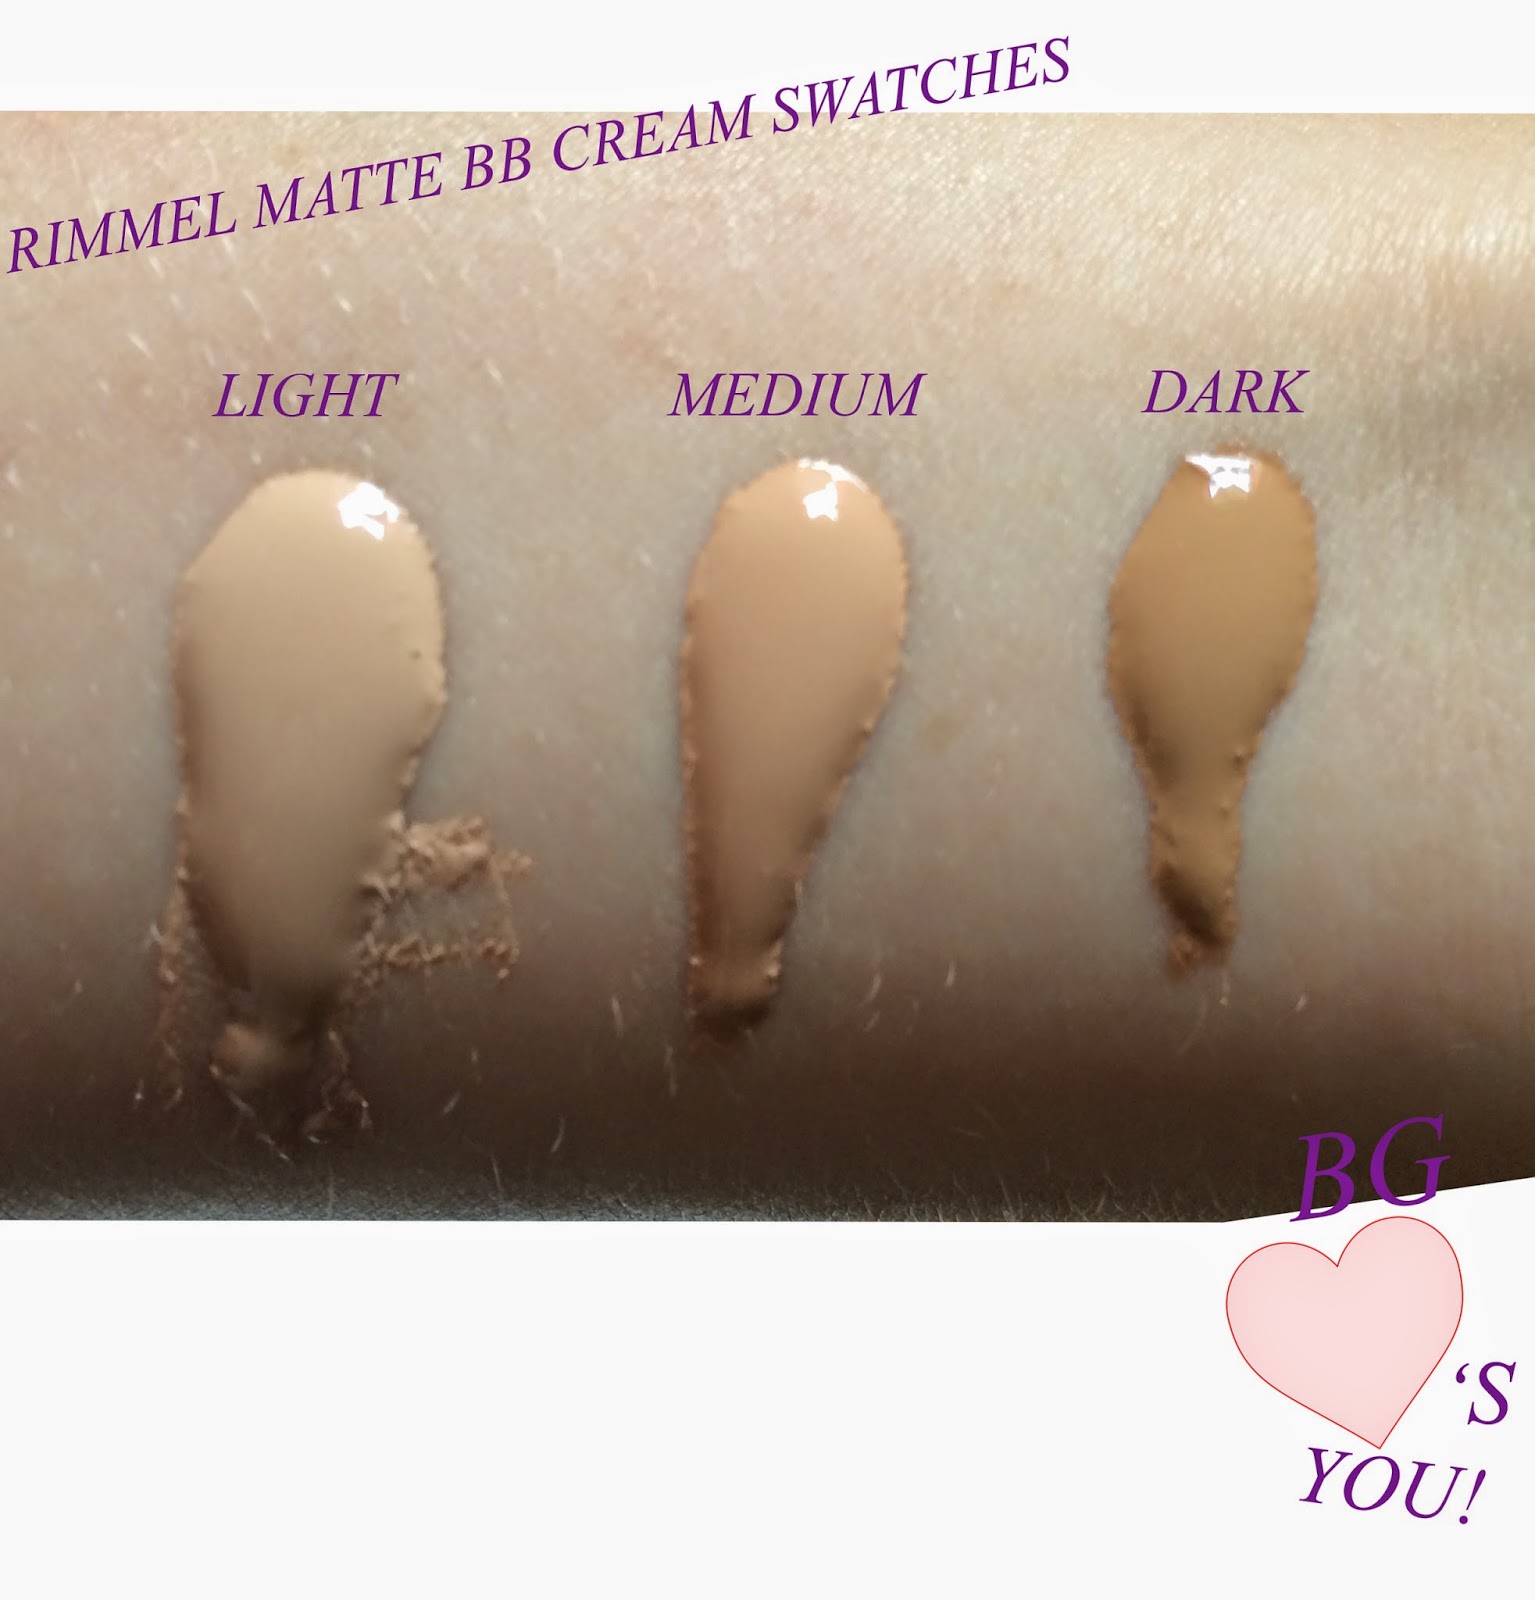
The range is made up of only 3 colours, which is very limited with the choice of Light, Medium or Dark. Light works for my skin tone worked in down my neck so as not to leave a crazy-lady foundation mask line.
Rimmel BB Cream Matte $12.95 available from www.priceline.com.au

This very sleepy selfie was snapped on my first day off in 3 weeks, 'Hello eye bags, I hate you, please leave my face'. I love this foundation for lazy make up days when the maximum amount of time I am spending on my face is 5 minutes. You can see it is a very sheer coverage and imperfections and dark spots are showing through but it has evened out my skin quite a lot and I feel good leaving the house to run errands without feeling the dreaded 'I'm naked without make up on' feeling.


xxx Nella

Twitter @beautegazette
Instagram @beautegazette
Google +  +Nella van veenendaal 
Bloglovin' HERE
TUMBLR HERE


** I was kindly gifted these products for blog consideration. This did not, in any way, influence my opinion on the product. Please refer to my policy and disclaimer for more information.

Thursday 3 April 2014

OMG IT'S A PANDA NAIL-ART TUTORIAL!!! Feat. Make Up Store's Dotting Tool

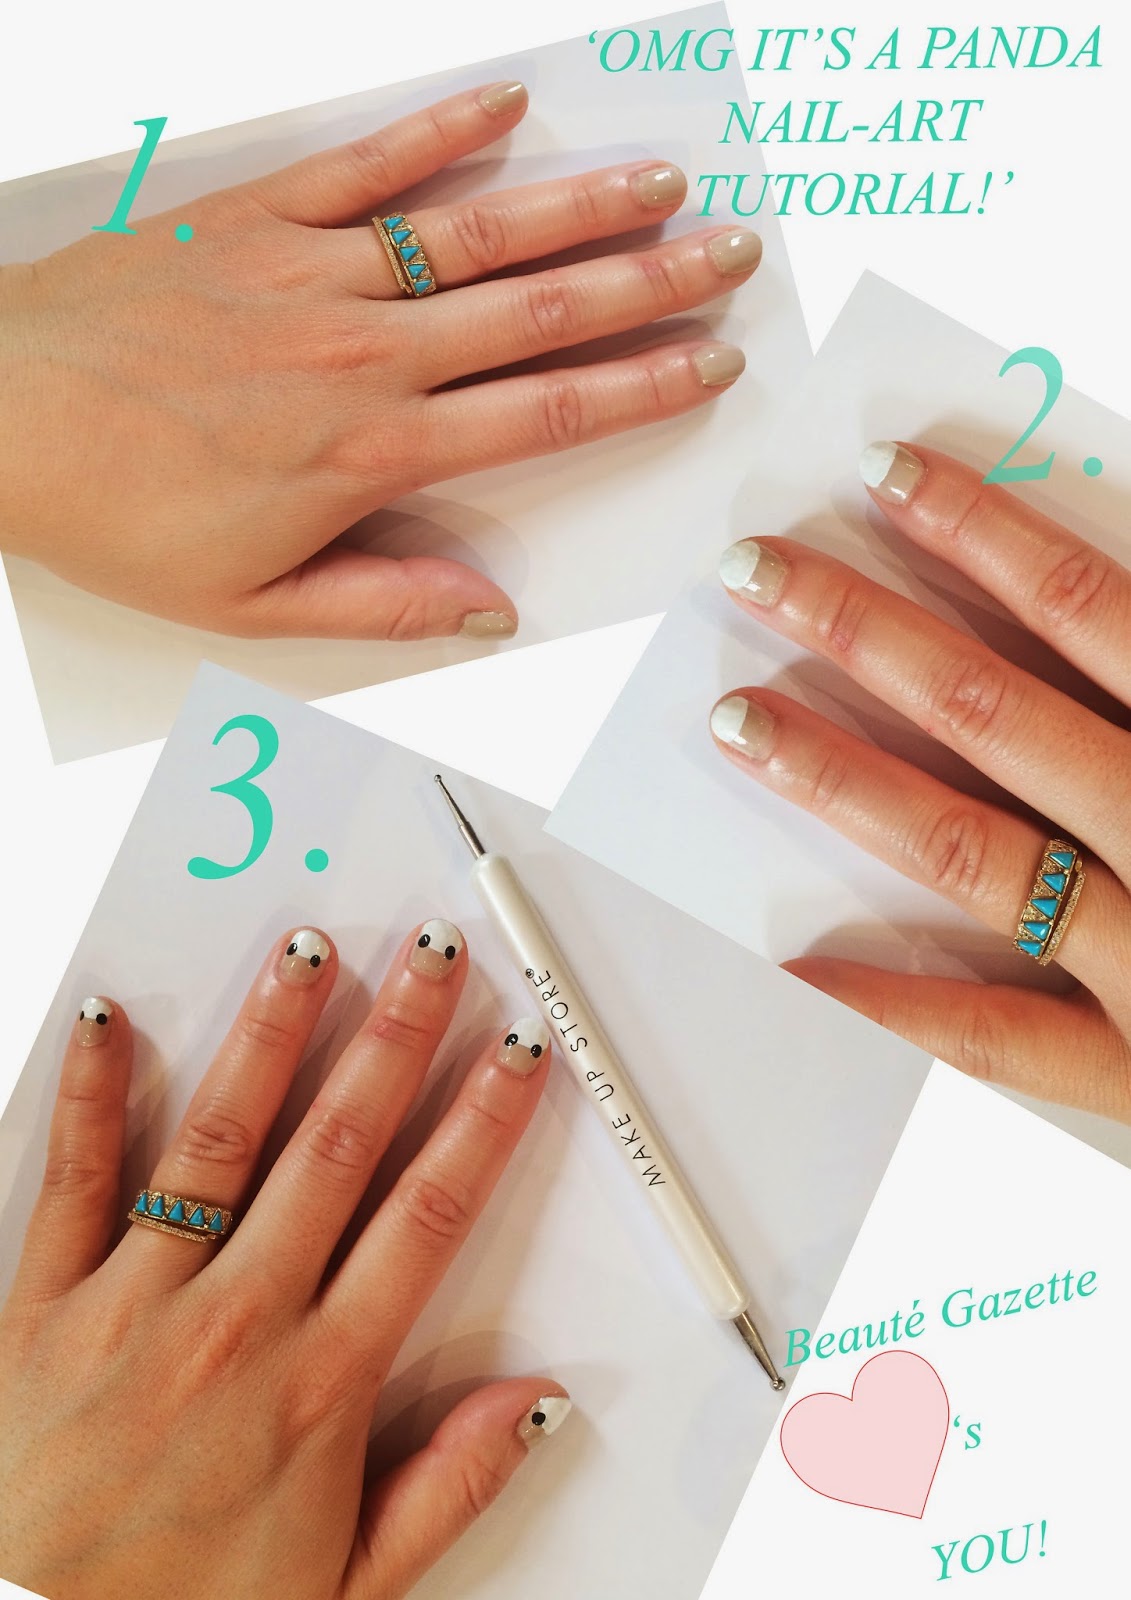
What happens when one of you greatest friends of all time Hana flys in for a whirl wind trip from New York City? You hang out immediately and paint each others nails obvs! But not just any nails.....THE MOST FREAKIN' ADORABLY CUTE PANDA NAILS! The design is super dooper easy to learn and you don't need to be a nail professional to master it, keep reading for my step-by-step tutorial:


1. Give your nails a good tidy up - trim your cuticles, buff and shape your nails into a rounded tip with a nail file. Then apply a base, you could use a clear polish but I prefer a nude to really make the panda pop! I used Essie St Tropez  

2. It's time to give your panda a head, for this you are going to need a white polish for the tutorial I used Rimmel Britt Manicure in Porcelin. Using the brush carefully paint a semi circle to about half way down the nail, just like in the image above. It my take two coats to become totally opaque. Then let dry for 15mins, making sure these coats are completely dry will make the next steps easier.

3. To create the ears, eyes and nose you will need to use a dotting tool with a fine end and a large end, I love this one from Make Up Store it has the perfect sized baubles to create millions of unique and totally cute nail designs. You will need a black polish for the ears, eyes and nose I used Rimmels 60's Nail polish in Black Out, pour out a tiny amount out onto a scrap piece of paper and dip the large end of the dotting tool into the black polish. Lightly dot on the ears to the top of the white semi circle. If you are unsure of how much polish will come off the dotting tool, practice dotting on the scrap paper first.


4. Now its time for the nose......omg its so cute. Dot the center of your nails at the very tip.

5. Almost done...Told you it was easy. For the eyes do two dots in the center of the semi circle and allow them to dry. Then Tipping a teensey-weensey amount of white paint onto your scrap paper and using the small end of the dotting tool do a very tiny white dot in the middle of your black dots which are the eyes. ALLOW TO DRY....and I mean really dry, give it a good 30mins before you apply a top coat. Otherwise the design will run when you apply a topcoat and your panda will be crying. Apply your favourite topcoat and enjoy having the cutest panda nails in the world!


xxx Nella

Twitter @beautegazette
Instagram @beautegazette
Google +  +Nella van veenendaal 
Bloglovin' HERE
TUMBLR HERE

Wednesday 2 April 2014

Bioderma Sébium Range Review


Bioderma Sébium is available from www.priceline.com.au

The French just do some things better than rest of the world - Pastries, Champagne, Nonchanlant attitudes and Skin Care. Over the past month I have been trialling the new (well new to the Australian market) Bioderma Sébium range, which is targeted to oily and acne prone skin. The technology that has gone in to creating this range is phenomenal, when it was explained to me at the product launch I felt like I was in a year 10 chemistry class. With all the science in the world aside, all that really matters is if the products work, right?! Below is my review of the full range of Bioderma Sébium range for your reading and skin care curious pleasure. If I had to pick a star product of the range it would be the Foaming Cleansing Gel, I have noticed a difference to my skin by using this daily in my skin care routine.

For the past year my first step in my evening skin care routine is to take my makeup off with a Bioderma soaked cotton round. I had been using the Bioderma H20 Crealine with the pink lid, which is gentle enough on my eyes to not sting when removing the massive amounts of mascara I wear on a daily basis. The Bioderna Sébium cleansing water is similar but I feel it gives an extra freshness to the skin, it effortlessly removes face makeup but also gives any areas which are breaking out an extra little detox cleans. I have however found this too irritating to use to remove my eye makeup so I will stick to the original for that.
This is a very granulated scrub which I love to using to get an extra clean face before applying a face mask once or twice a week. But if I am just using it in the shower I tend to focus the scrub just in my T-zone where I am most oily. 
For me this has been the stand out product of the range, it has reduced the amount of oil my skin is producing and I love how clean my face feels after using it. Using 2 pumps of the Bioderma Cleansing Gel on my Clarisonic has been the most effective way of applying it to get good results. Maybe because the brush works the gel into the skin more? I don't know but I love it.
I have terrible luck with mattifying primers, maybe it is because I have the oiliest skin of all time? This primer does smooth out flaws and pores for about 10mins after I have applied it looks great but then my oily skin breaks through again. It would be better suited to an oily combination skin, or anyone who is less oily than me.
If you are like me and have areas of your face which break out in more than others and you are looking for a product which you only need to apply to a targeted area then this is your guy! For me my chin is the spotty zone of my face which just gets bombarded with spots every month at that time, so applying this under my moisturiser has made a difference in the time it takes for a break up to heal and pass.

Pourquoi est le français soins de la peau toujours si diablement bon?!
TRANSLATED
Why is french skin care always so damn good?!


xxx Nella

Twitter @beautegazette
Instagram @beautegazette
Google +  +Nella van veenendaal 
Bloglovin' HERE
TUMBLR HERE

** I was kindly gifted these products for blog consideration. This did not, in any way, influence my opinion on the product. Please refer to my policy and disclaimer for more information.


Related Posts Plugin for WordPress, Blogger...