Showing posts with label Daisy Nail Art. Show all posts

Monday, 23 June 2014

NAIL WEEK!! Day 4 : New O.P.I Collections SPOTLIGHT ON GLITTER & SHEER TINTS

O.P.I has two new releases out which have got me super excited - Sheer Tints & Spotlight on Glitter! They are a break from the celebrity collections and are a must for any nail polish addict.

Sheer Tint's are a jelly formula polish, thicker than a standard polish but with only a slightly longer dry time. These were a bit tricky on the first application (as you can see there are a few overlaps and bumps on my nails above.) but I asked one of my favourite nail bloggers Maria from So Nailicious for her advice on the Sheer Tints :
- Always apply a white base coat before the sheer tint.
- Use a small fine tip paint brush to do your sheer tint nail art because the formula is too thick on the brush that comes in the bottle.
I followed these tips and found them very useful - Thanks Maria!
The daisy design worked best because of the white polish peaking through, I love the cute water colour effect it gave to the design. Next I am going to try and do a tartan/plaid design building up opacity, like Maria featured on her blog.
OPI Sheer Tint Nail Polish Colours $19.95each available from www.davidjones.com.au 


From left to right: Chasing Rainbows, Desperately Seeking Sequin, Blush Hour, Rose of Light & I Reached My Gold.

Glitter hasn't slowed down on the nail trend-o-meter, but I have found that the trend has moved to placement glitter. With the most popular being a glitter french tip or gradient glitter moving up from the cuticle base of the nail to the tip, rather than the traditional glitter topcoat look.

OPI Spotlight on Glitter Nail Polish Colours $19.95each available from www.davidjones.com.au 

'I Reached My Gold' - The most chunky of the glitters features gold hexagonal yellow gold glitter with smaller confetti silver and gold pieces.

'You Pink Too Much' - Very pretty small shimmer based rose pink glitter with silver accents.

'Rose of Light' - Rose Gold and light pink shimmer fine glitter, highly reflective.

'Blush Hour' - The only tinted base colour, sheer fuchsia base with purple glitter pieces and silver shimmer accents.

'Chasing Rainbows' - If you didn't get your hands on the coveted 'Rainbow Connection' this is an amazing dupe/update without the hype. It is party confetti on your nails.

'Desperately Seeking Sequin' - If this was a nail polish was a person it would be Diana Ross, an amazing silver streamer shimmer combo which gives amazing rainbow reflection.


xx Nella
Twitter @beautegazette
Instagram @beautegazette
Google +  +Nella van veenendaal 
Bloglovin' HERE


** I was kindly gifted these products for blog consideration. This did not, in any way, influence my opinion on the product. Please refer to my policy and disclaimer for more information.

Thursday, 3 April 2014

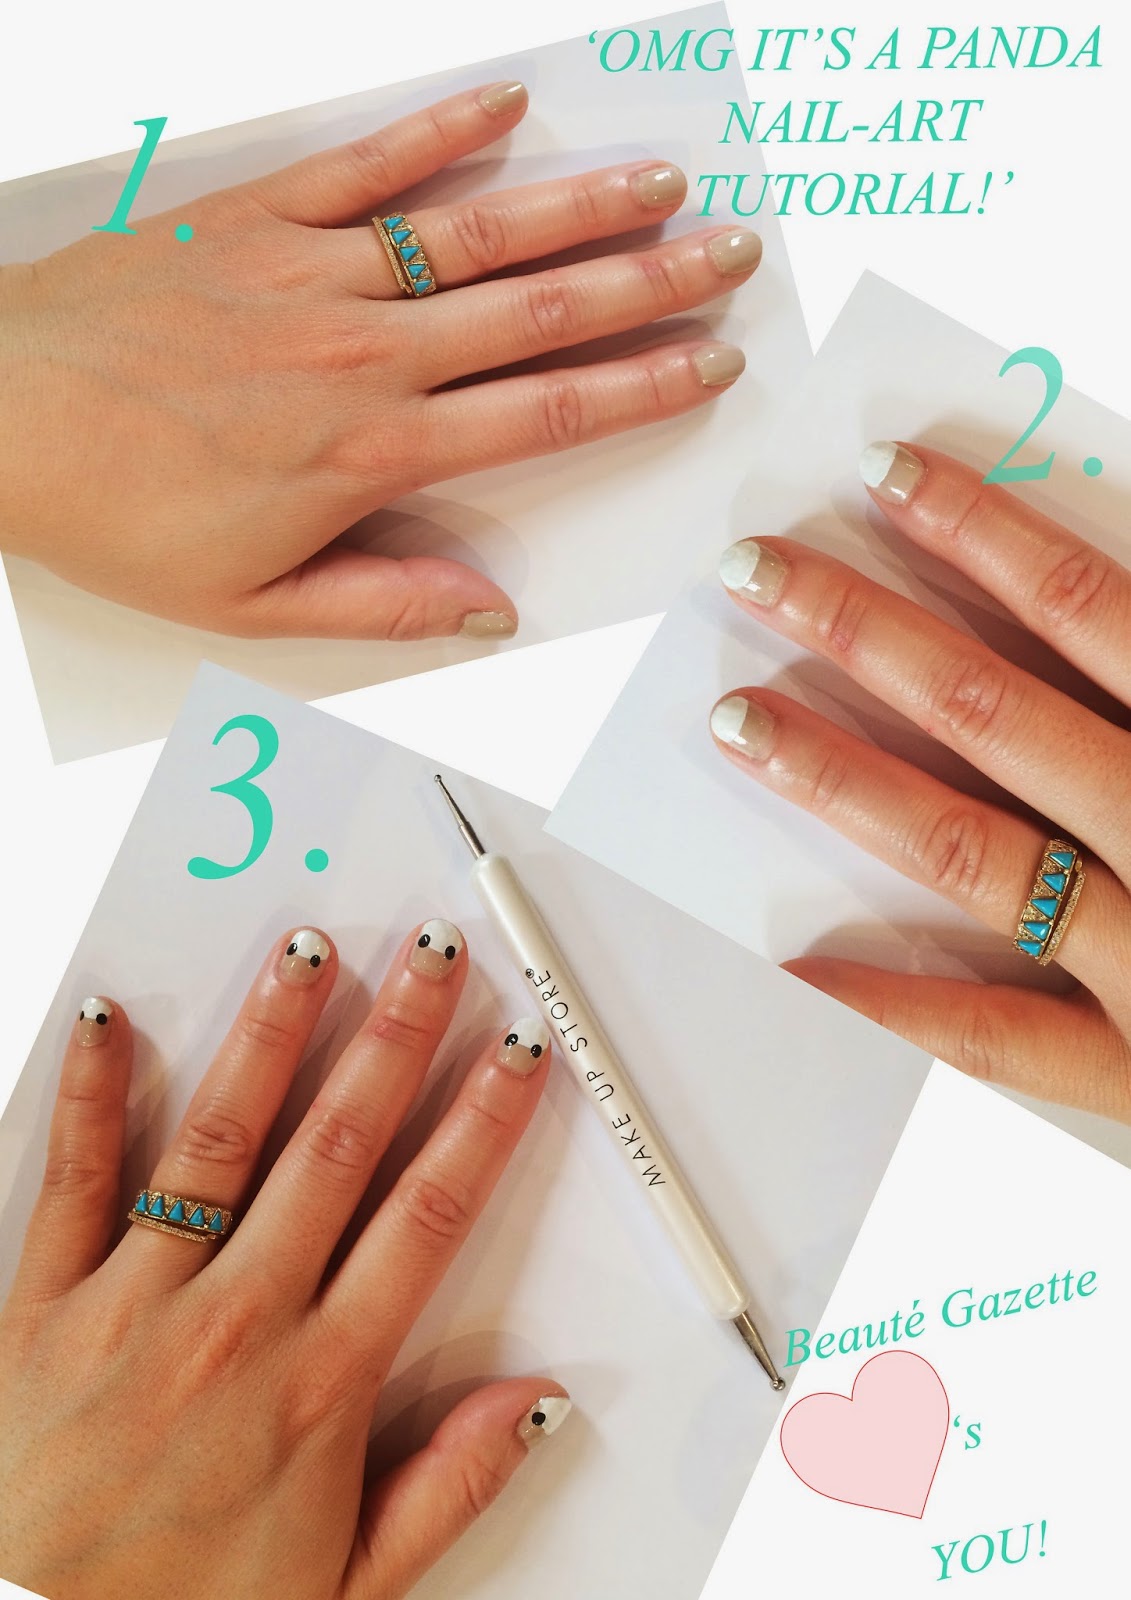
OMG IT'S A PANDA NAIL-ART TUTORIAL!!! Feat. Make Up Store's Dotting Tool

What happens when one of you greatest friends of all time Hana flys in for a whirl wind trip from New York City? You hang out immediately and paint each others nails obvs! But not just any nails.....THE MOST FREAKIN' ADORABLY CUTE PANDA NAILS! The design is super dooper easy to learn and you don't need to be a nail professional to master it, keep reading for my step-by-step tutorial:


1. Give your nails a good tidy up - trim your cuticles, buff and shape your nails into a rounded tip with a nail file. Then apply a base, you could use a clear polish but I prefer a nude to really make the panda pop! I used Essie St Tropez  

2. It's time to give your panda a head, for this you are going to need a white polish for the tutorial I used Rimmel Britt Manicure in Porcelin. Using the brush carefully paint a semi circle to about half way down the nail, just like in the image above. It my take two coats to become totally opaque. Then let dry for 15mins, making sure these coats are completely dry will make the next steps easier.

3. To create the ears, eyes and nose you will need to use a dotting tool with a fine end and a large end, I love this one from Make Up Store it has the perfect sized baubles to create millions of unique and totally cute nail designs. You will need a black polish for the ears, eyes and nose I used Rimmels 60's Nail polish in Black Out, pour out a tiny amount out onto a scrap piece of paper and dip the large end of the dotting tool into the black polish. Lightly dot on the ears to the top of the white semi circle. If you are unsure of how much polish will come off the dotting tool, practice dotting on the scrap paper first.


4. Now its time for the nose......omg its so cute. Dot the center of your nails at the very tip.

5. Almost done...Told you it was easy. For the eyes do two dots in the center of the semi circle and allow them to dry. Then Tipping a teensey-weensey amount of white paint onto your scrap paper and using the small end of the dotting tool do a very tiny white dot in the middle of your black dots which are the eyes. ALLOW TO DRY....and I mean really dry, give it a good 30mins before you apply a top coat. Otherwise the design will run when you apply a topcoat and your panda will be crying. Apply your favourite topcoat and enjoy having the cutest panda nails in the world!


xxx Nella

Twitter @beautegazette
Instagram @beautegazette
Google +  +Nella van veenendaal 
Bloglovin' HERE
TUMBLR HERE

Wednesday, 12 June 2013

DIY TRIPPY-HIPPY DAISY NAIL TUTORIAL

Who doesn't want TRIPPED OUT DAISY NAILS?
Here is an easy-peasy DIY tutorial on how to achieve some pretty sick petals.
Switch up the design and colours with whatever you have at hand and get painting!


xxx Nella

Twitter @beautegazette
Google +  +Nella van veenendaal 
Bloglovin' HERE
Related Posts Plugin for WordPress, Blogger...