Showing posts with label DIY Nails. Show all posts

Saturday, 5 July 2014

My favourite products to give yourself the best home manicure ever!


ORLY Nailtrician and Cutique $19.95 each available from www.orlybeauty.com.au  Out the Door Top Coat $10.95 available from www.thenailshop.com.au Sally Hansen Acetone Free Nail Polish Remover $5.45 available from www.priceline.com.au Rational Anti-Aging Hand Cream available from www.rationale.com

Let's face it weekly nail salon visit are too costly and time consuming for most of us, but here are my fave products to give yourself the best home manicure ever, the only thing missing is the massage chair and foot spa.

ORLY NAILTRICIAN 
This is the only treatment base coat that has made any difference to my nails, the nail surface is smoother and they are definitely stronger. TIP: If you are only wearing this on your nails to strengthen them then sealing with a topcoat this helps the nailrician stay on your nails longer.

ORLY CUTIQUE
The best way to start any manicure is to clean up your cuticles, I mean really clean them up! It helps polish last longer and looks a lot neater. Cuticle removing gels are a great way to treat cuticles at home, simply apply to your nail beds leave on for 10mins or so and then push cuticles back with an orange stick. There will be little gross bits of skin that will come off when you do this, which is a good thing. 

OUT THE DOOR TOP COAT
Top Coats have become one of the most important steps in a manicure, they are the not-so-secret finishing stage which allows you to achieve high gloss gel like nails. It's very easy to distinguish between a good and bad top coat, for me the deciding factor is dry time if your nails aren't touch dry in 10mins then it is crap. Out the Door and Seche Veit are the two most popular in the professional nail game, but if you cannot get your hands on these then Revlon's Gel Top Coat is a great easy to find very comparable alternative.

SALLY HANSEN NAIL POLISH REMOVER
This is my go to remover, it isn't as potent smelling as other brands, I use a Non-Acetone remover on regular polish and straight up 100% Acetone to remove gel or shellac polish. 

RATIONAL ANTI-AGING HAND CREAM
This very extravagant hand cream is my new fave, it isn't too heavy on the fragrance and doesn't leave my hands feeling greasy. The best advice I can give you is to carry and hand cream with you in your hand bag or in your car that contains SPF, when driving your hands are always in direct sunlight and UVA rays go through glass ageing your hands with sun damage. To avoid horrible age spots on your hands apply your SPF hand cream every time you get in the car.

xx Nella
Twitter @beautegazette
Instagram @beautegazette
Google +  +Nella van veenendaal 
Bloglovin' HERE


Monday, 23 June 2014

NAIL WEEK!! Day 4 : New O.P.I Collections SPOTLIGHT ON GLITTER & SHEER TINTS

O.P.I has two new releases out which have got me super excited - Sheer Tints & Spotlight on Glitter! They are a break from the celebrity collections and are a must for any nail polish addict.

Sheer Tint's are a jelly formula polish, thicker than a standard polish but with only a slightly longer dry time. These were a bit tricky on the first application (as you can see there are a few overlaps and bumps on my nails above.) but I asked one of my favourite nail bloggers Maria from So Nailicious for her advice on the Sheer Tints :
- Always apply a white base coat before the sheer tint.
- Use a small fine tip paint brush to do your sheer tint nail art because the formula is too thick on the brush that comes in the bottle.
I followed these tips and found them very useful - Thanks Maria!
The daisy design worked best because of the white polish peaking through, I love the cute water colour effect it gave to the design. Next I am going to try and do a tartan/plaid design building up opacity, like Maria featured on her blog.
OPI Sheer Tint Nail Polish Colours $19.95each available from www.davidjones.com.au 


From left to right: Chasing Rainbows, Desperately Seeking Sequin, Blush Hour, Rose of Light & I Reached My Gold.

Glitter hasn't slowed down on the nail trend-o-meter, but I have found that the trend has moved to placement glitter. With the most popular being a glitter french tip or gradient glitter moving up from the cuticle base of the nail to the tip, rather than the traditional glitter topcoat look.

OPI Spotlight on Glitter Nail Polish Colours $19.95each available from www.davidjones.com.au 

'I Reached My Gold' - The most chunky of the glitters features gold hexagonal yellow gold glitter with smaller confetti silver and gold pieces.

'You Pink Too Much' - Very pretty small shimmer based rose pink glitter with silver accents.

'Rose of Light' - Rose Gold and light pink shimmer fine glitter, highly reflective.

'Blush Hour' - The only tinted base colour, sheer fuchsia base with purple glitter pieces and silver shimmer accents.

'Chasing Rainbows' - If you didn't get your hands on the coveted 'Rainbow Connection' this is an amazing dupe/update without the hype. It is party confetti on your nails.

'Desperately Seeking Sequin' - If this was a nail polish was a person it would be Diana Ross, an amazing silver streamer shimmer combo which gives amazing rainbow reflection.


xx Nella
Twitter @beautegazette
Instagram @beautegazette
Google +  +Nella van veenendaal 
Bloglovin' HERE


** I was kindly gifted these products for blog consideration. This did not, in any way, influence my opinion on the product. Please refer to my policy and disclaimer for more information.

Tuesday, 17 June 2014

NAIL WEEK! Day 2 : Half-Moon Nail Art with Mary-Kay Nail Lacquers


Nail Week : Day 2 is all about wearable nail art trends, a favourite staple in the nail art trends over the past few seasons is the Half-Moon design. It is classic and very versatile, by switching the colours you can create different seasonal combos and tonal variations. Ok let's do this!
Mary-Kay Nail Lacquers in Mulberry Forest and Enchanted Mauve $15.00 each available from www.marykay.com.au

If you follow me on instagram @beautegazette you would have seen my rave reviews of the Mary Kay Nail Lacquers, they are phenomenal colours and super fast drying. Combining the soft ballet nude of Enchanted Mauve with the rich Mulberry Forest gives a very polished yet edgy look to the nails and the colour combination is perfect for the cooler winter months. Both of the colours are from Mary Kay's new Fairy Tales and Fantasy collection, which is now available online from their website - gone are the days of waiting for a consultant it is now only a few clicks away.

STEP 1:
Paint your nude base coat 'Enchanted Mauve' is a great base as it has a very quick dry time, which is what you want when you are layering colours for nail art designs.
STEP 2:
Pour out a small pea size amount of 'Mulberry Forrest' on a disposable piece of paper, this is the polish you will use for the half moons.
STEP 3:
Using a small fine tipped craft brush map out the Half-Moon shape in 'Mulberry Forest', outlining the semi circle. Take your time to be neat and precise.
STEP 4:
Fill in the Half- Moon semi circles with polish, this will take 2 coats. Leave the first coat to dry before starting the second coat otherwise it will all gloop together on your nail.
STEP 5:
Once your nails have completely dried, clean up your cuticles with a cotton tip soaked in nail polish remover. Then apply your favourite Topcoat to make your amazing new nails last a little longer and add some mega shine!

Mary-Kay Nail Lacquers in Mulberry Forest and Enchanted Mauve $15.00 each available from www.marykay.com.au


xx Nella
Twitter @beautegazette
Instagram @beautegazette
Google +  +Nella van veenendaal 
Bloglovin' HERE
TUMBLR HER

Monday, 28 April 2014

DIY Gel Nails : Sally Hansen Salon Gel Polish Feat. 'Cherry,Cherry, Bang, Bang'

Sick of spending $50 on a shellac or gel mani at the nail salon, me too! So when Priceline were having 20% Sally Hansen yesterday I decided to pick up a few colours as well as the base and top coats to try and DIY myself a salon quality gel mani at home.... 

Before the tutorial here are a few tips and tricks:

- If you cannot 'colour within the lines' (thank you Carrie Bradshaw SATC quote which i will not apologise for) and you are quite messy when painting your nails with regular polish then this is not for you.

- I did already had an LED Lamp of a different brand. After much google research, I found there are different LED lamps for gel and shellac. This lamp is for gel, it has a different watt to a shellac curing lamp. Just google it if you are using a different brand lamp to the gel polish you are applying.

- Pick a colour which is going to go with a weeks worth of outfits and occasions!

Sally Hansen Gel Base and Top Coat $19.95/4ml & Sally Hansen Gel Nail Colour $19.95/7ml available from www.priceline.com 

What you will need:
1. Nail clippers
2. Nail file
3. Orange Stick
4. Nail Buffer
5. Sally Hansen Salon Gel Polish - Base Coat - Step 1
6. Sally Hansen Salon Gel Polish - Nail Colour - Step 2
7. Sally Hansen Salon Gel Polish - Top Coat - Step 3
8. LED curing light

Step 1:
The best way to make an at home gel mani to last is to give your nails a good prep; trim and dead skin, file, buff and push your cuticles back with an orange stick.

*Tip : It is easiest if you complete all steps to one hand at a time but only fingers, complete thumbs together (see photo below) this is the fastest method of at home gels and safest in terms of screwing up uncured nails.*

Step 2:
With clean prepped nails it is time for the gel base coat, paint a thin layer of the base coat and cure under the LED lamp for 30seconds.

Step 3.
Time for the colour, like a traditional nail polish this will 2 two coats. Paint on a thin layer for the first coat, then cure under the LED lamp for 30seconds. For the second coat, even out the opacity and also make sure to cover the tip of the nail completely, this will seal the nail then cure under the LED lamp for 30seconds again.....repetitive sorry.

Step 4.

Top coat time, when applying the top coat make sure you go all the way to the edges of the nail, if you go onto the skin use the orange stick to scrape it off before curing and for the final time cure under the LED lamp for 30seconds.

Step 5.

Nails will feel sticky, they are not wet it is residue from the process, on a cotton round soaked with rubbing alcohol wipe the nails till they feel glossy and smooth!

Final thoughts:
My Sally Hansen Gel Polish mani lasted for approximately 1 week, with 2 nails completely peeling off which I thought was a fair amount of time even though on the box it claims to last for 2 weeks. Having tried a few other at home gel polish brands and they have been rubbish compared to the Sally Hansen Gel Polishes, the consistency was thicker and felt tacky when trying to apply more than one layer, they were also far more expensive. The colour selection of the Sally Hansen Gel polishes is quite limited at the moment but I'm hoping in time the shade range will be increased as this is now my go-to at home gel mani brand of choice.
The colour is bangin'! It is a grown up grape with a muted pastel cherry vibe in some lights, perfect for the cooler weather.

xxx Nella

Twitter @beautegazette
Instagram @beautegazette
Google +  +Nella van veenendaal 
Bloglovin' HERE
TUMBLR HERE


Thursday, 3 April 2014

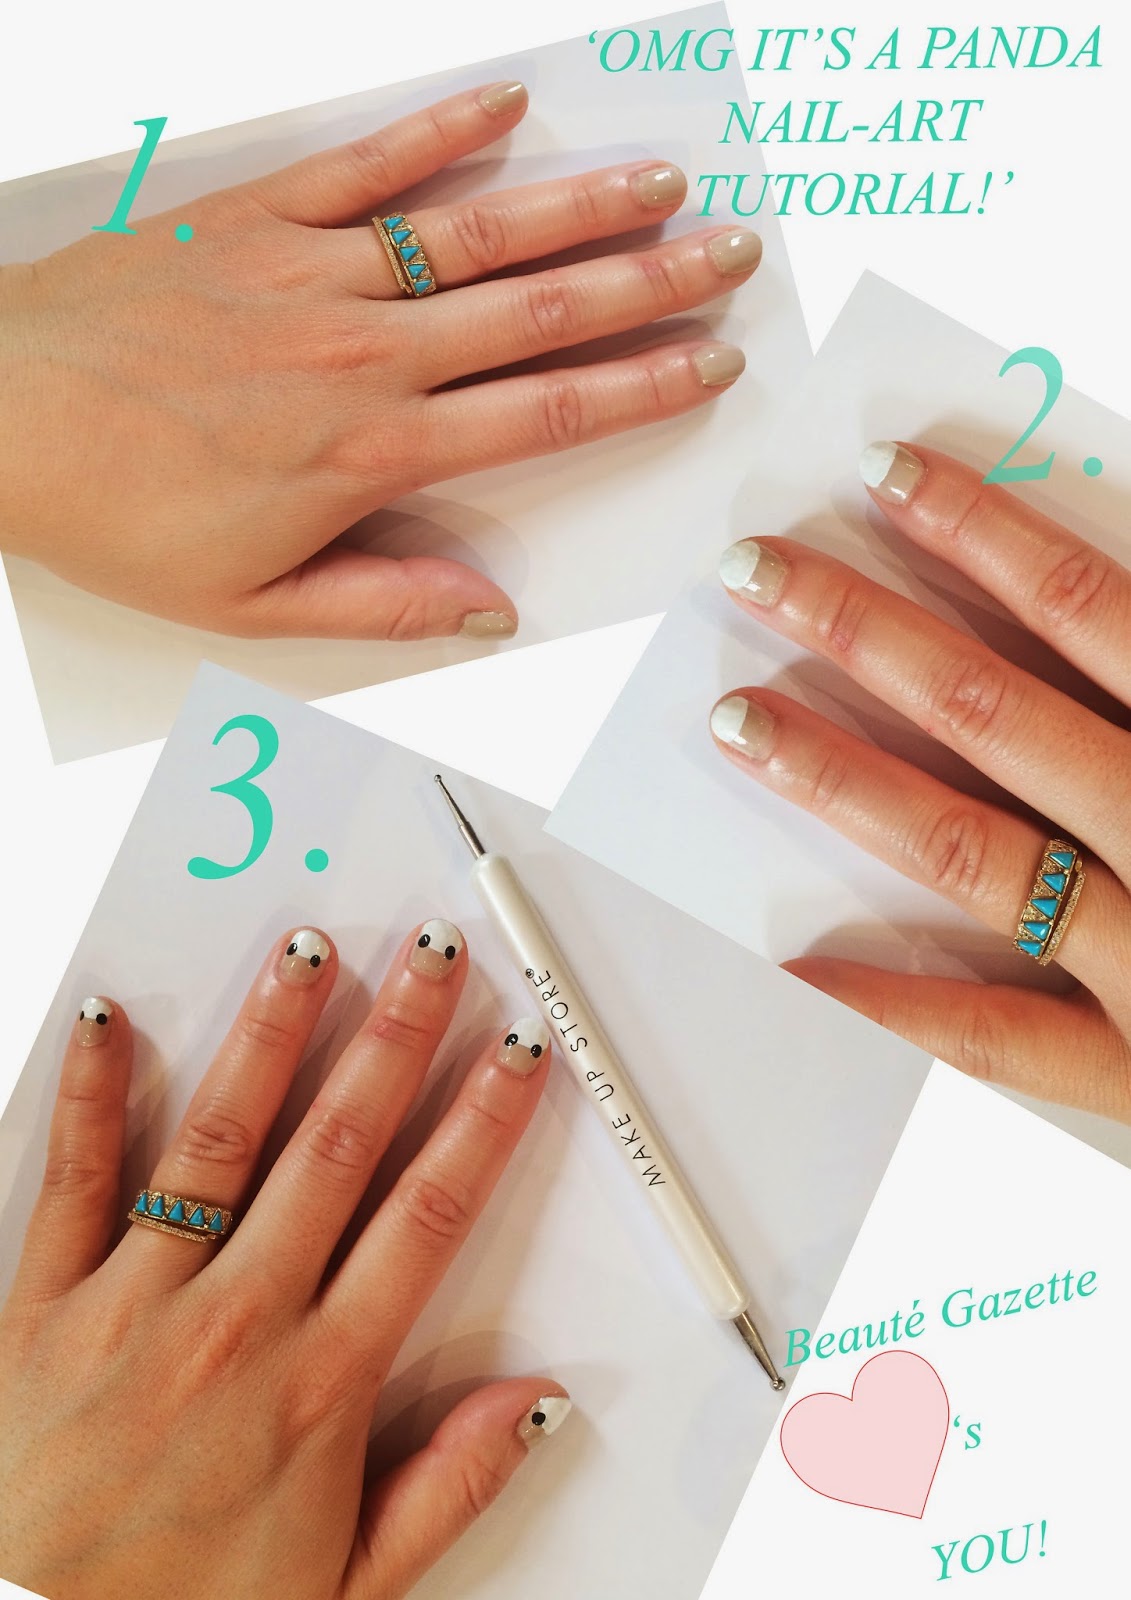
OMG IT'S A PANDA NAIL-ART TUTORIAL!!! Feat. Make Up Store's Dotting Tool

What happens when one of you greatest friends of all time Hana flys in for a whirl wind trip from New York City? You hang out immediately and paint each others nails obvs! But not just any nails.....THE MOST FREAKIN' ADORABLY CUTE PANDA NAILS! The design is super dooper easy to learn and you don't need to be a nail professional to master it, keep reading for my step-by-step tutorial:


1. Give your nails a good tidy up - trim your cuticles, buff and shape your nails into a rounded tip with a nail file. Then apply a base, you could use a clear polish but I prefer a nude to really make the panda pop! I used Essie St Tropez  

2. It's time to give your panda a head, for this you are going to need a white polish for the tutorial I used Rimmel Britt Manicure in Porcelin. Using the brush carefully paint a semi circle to about half way down the nail, just like in the image above. It my take two coats to become totally opaque. Then let dry for 15mins, making sure these coats are completely dry will make the next steps easier.

3. To create the ears, eyes and nose you will need to use a dotting tool with a fine end and a large end, I love this one from Make Up Store it has the perfect sized baubles to create millions of unique and totally cute nail designs. You will need a black polish for the ears, eyes and nose I used Rimmels 60's Nail polish in Black Out, pour out a tiny amount out onto a scrap piece of paper and dip the large end of the dotting tool into the black polish. Lightly dot on the ears to the top of the white semi circle. If you are unsure of how much polish will come off the dotting tool, practice dotting on the scrap paper first.


4. Now its time for the nose......omg its so cute. Dot the center of your nails at the very tip.

5. Almost done...Told you it was easy. For the eyes do two dots in the center of the semi circle and allow them to dry. Then Tipping a teensey-weensey amount of white paint onto your scrap paper and using the small end of the dotting tool do a very tiny white dot in the middle of your black dots which are the eyes. ALLOW TO DRY....and I mean really dry, give it a good 30mins before you apply a top coat. Otherwise the design will run when you apply a topcoat and your panda will be crying. Apply your favourite topcoat and enjoy having the cutest panda nails in the world!


xxx Nella

Twitter @beautegazette
Instagram @beautegazette
Google +  +Nella van veenendaal 
Bloglovin' HERE
TUMBLR HERE

Tuesday, 28 January 2014

'Pink Ladies' - Rimmel Salon Pro '701 Jazz Funk

Rimmel Salon Pro in '701 Jazz Funk' $8.85 available from www.priceline.com.au

Sometimes you just need to paint your nails pink and feel like a lady, preferably whilst listing to love power ballads and in a silk dressing gown. This is what I did yesterday.
Pink polish has been pushed to the back of my collection (yes, I own a LOT of nail polish that it is a 'collection') favouring neutrals, glitters and that 6 months that Rouge Noir ruled every girls nails. My love for pink polishes is back and first stop was Rimmel's Salon Pro by Kate Moss polish in '701 Jazz Funk'. Shit name, amazing polish! This range of polishes has my favourite type of brush, wide and flat which evenly coats the nail with polish. The polish applies smoothly and does not well in your cuticles which gives you that salon manicure look. It is opaque in two coats and dries fairly quickly. 'Jazz Funk' is dulled down fuchsia, it is more a flamingo pink and is totally girly!

Sally Hansen Diamond Flash Top Coat $13.95 available from www.priceline.com.au

I had to mention that I have been trying out a new top coat Sally Hansen's Diamond Flash Top Coat, it is amazing! The dry time is under 5 minutes, sealing in your coloured polish and making it dry too. The shine factor is beyond sparkling and gives the look of gel nails. Try it out if you are as inpatient as I am and need to get on with your life ASAP after painting your nails.

xxx Nella

Twitter @beautegazette
Google +  +Nella van veenendaal 
Bloglovin' HERE
TUMBLR HERE


Monday, 14 October 2013

MANICURE MONDAY: Sally Hansen's Complete Salon Manicure in 'Barracuda'

Sally Hansen's Complete Salon Manicure in 'Barracuda' $14.95 available from www.priceline.com.au

Manicure Monday is officially my new favourite day of the week, it has become a little ritual that preps me for my week ahead. Some people iron their clothes for work, I paint my nails!
This week I have a bazillion things to do, but the most exciting thing in my diary is seeing the new Diana film starring 'our' Naomi Watts. To say I have a Princess Diana obsession would be an understatement, have been absolutely desperate to see this film - now I know how those obsessed crazed Harry Potter Fans felt every time a new Potter film came out. When selecting my polish for the week it had to be a blue, obviously to reference Diana's love of sapphires.

'Barracuda' is one of the new limited edition Spring shades from Sally Hansen's Complete Salon Manicure line and its goddamn beautiful! Pastels polishes are known for applying with streaks and can take 3 or more layers to become even but 'Barracuda' is beyond flawless in application opaque and streak free in two coats without welling in your cuticles. The brush is a dream to use with a rounded flat end which fits into the curve of your nail bed giving a very neat finish. If you feel like you are just one of those people who cannot paint your own nails because you turn into a clumsy mess, then I would highly recommend trying out the Complete Salon Manicure line of polishes. 'Barracuda' is a white based pastel baby blue and is a total dupe for Chanel's 'Riva' polish without all the premature chipping. 


xxx Nella

Twitter @beautegazette
Google +  +Nella van veenendaal 
Bloglovin' HERE
TUMBLR HERE


Wednesday, 10 July 2013

It's all about the gloss!


The classic glossy clear nails teamed with stacked black diamond knuckle rings at Chanel Fall 2013 Couture in Paris last week were so frenchy' so chic' and it made me want to take off my glittery baby blue nail polish as as soon as I saw it.
As much as I cannot resist glitter polish and poppy bright nails sometimes a simple look can have just as much impact. The key is to give yourself a good manicure and I mean the works; trim your cuticles, buff & file and apply a generous amount of hand cream.  
Top Coats are so hit and miss, some apply well and you think you are onto a winner and then end up chipping within 24-hours. Here are a few which has past my rigorous testing routines:

Butter London -  Hardwear Top Coat $24.95
P.D.Q stands for Pretty Darn Quick and thats definitely how fast this polish dries, it is also free of Formaldehyde, Toulene & DBP and safe for pregnant women to use.
available from www.adorebeauty.com.au

Kester Black - Base and Top Coat $17.00
With my hand on my heart I tell you - KESTER BLACK IS SO FRICKIN' AMAZIN! 
The colour ranges are somethin' like a phenomenon - especially the glitters. This top and base coat is 100% vegan friendly & cruelty free! Also free of the five nail polish nasties DBP, Toulene, Formaldehyde, Camphor & Formaldehyde Resin - so totally safe to use if you are pregnant or breast feeding.
available from www.kesterblack.com

Orly - Won't Chip $10.95
I was at an Orly PR event a couple of months ago, they we doing manicures with their new range of colours for Beauty Bloggers. Unfortunately I didn't partake because I had painted my nails the night before with Revlon- Ruby and used the Orly Won't Chip Top Coat. The girls at Orly all commented about how glossy my nails were and asked what I used - which proves the best PR is a good product!
Won't Chip gives the illusion of gel nails applying thick leaving nails ultra glossy.
available from www.orlybeauty.com

Revlon ColourStay - Top Coat $16.95
If you have a problem with your nail polish chipping after a day or so then I would recommend you trying out the Revlon ColourStay Top Coat, it makes my notoriously bad Chanel polishes stay put without chipping for at least 3 days. It's quite pricey but totally worth it, I have never had a bottle dry up or clump using it right to the end.
available from www.priceline.com.au

xxx Nella

 Twitter @beautegazette
Google +  +Nella van veenendaal 
Bloglovin' HERE

Monday, 17 June 2013

Deborah Lippmann's 'Across The Universe' VERSUS Sally Hansen's 'Mermaids Tale'

The word 'dupe' is used quite a lot within the online beauty world and I don't really believe in dupes. If you want to buy a Chanel lipstick then there are many more reasons you are buying it rather than just for the colour i.e packaging, branding, prestige etc. So in this case if you want to splash out and order a Deborah Lippmann nail polish from the states and that's what your into then its totally cool but if you are more likely to pop into Priceline and pick up a bottle of Sally Hansen's 'Mermaids tale' then that's cool too. Both polishes give a very similar finish to your nails, but are quite different in application.
So I am just going to give you the facts:

Deborah Lippmann 'Across The Universe'
Availability: Only online for Australian consumers at www.revolveclothing.com
Price: $19.85each
Application and lasting time: The appearance of the polish in the bottle is deceiving, the glitter is suspended in a sheer jelly base. It takes about 3 and a half coats to become completely opaque on the nail making dry time a real pain, time to put on Benjamin Button or some other really long movie and not touch anything for about 2 and a half hours. Only apply a topcoat to your nails once the polish is dry, otherwise you will move the glitter pieces around and it will look a bit of a mess. Lasting time was ok, but because of how thickly you need to apply the polish it does chip in a 3 to 4 days. I like applying this polish over a navy blue base colour to avoid having to apply so many coats.

Sally Hansen Complete Salon Manicure in 'Mermaids Tale' 
Availability: From Priceline stores and www.priceline.com.au
Price: $14.95each
Application and lasting time: Applying this polish is a dream, the Salon Manicure range has very wide brush which fits neatly into your nail bed and requires less stroke to cover your entire nail. It takes 2 coats to achieve an opaque finish on the nail with the glitter applying evenly and not clumping. It definitely needs a topcoat to give the surface an even and glossy look. 'Mermaids Tale' lasted 5 days with minimal chipping which is quite good considering the amount of washing up and champagne drinking I did on the week of wearing the polish.


xxx Nella

Twitter @beautegazette
Google +  +Nella van veenendaal 
Bloglovin' HERE

Wednesday, 12 June 2013

DIY TRIPPY-HIPPY DAISY NAIL TUTORIAL

Who doesn't want TRIPPED OUT DAISY NAILS?
Here is an easy-peasy DIY tutorial on how to achieve some pretty sick petals.
Switch up the design and colours with whatever you have at hand and get painting!


xxx Nella

Twitter @beautegazette
Google +  +Nella van veenendaal 
Bloglovin' HERE

Tuesday, 28 May 2013

Essie's 'Lady Like' Nail Polish

PROLOGUE
Have you ever been so tired that you fall asleep on the bus and your head flops forward and you wake up and you are nowhere near you stop and you feel so disorientated that you almost cry? Well thats how I have been feeling. It's been a bit of a mind-body-soul-freak-out, as a result I have had a bad case of 'Bloggers Block'. I go shopping and buy things or get sent things and I look at the little box of cosmetic goodness and I go blankety-blank. So please excuse the lack of regular posts, I am starting to feel more inspired and I spent all day playing with nail polish - My version of the most cathodic relaxing time ever!

Do you find the new wave of  'foundation' (skin tone mimicking colours) nude nail polishes wash your skin out and make your hands look pale, grey and old? Then just don't go there girlfriend!
Take it back a notch....well try taking it back about 2 decades. Essie's 'Lady Like' is a mauve based dusty pink, it would have been on every babes nails in about 1984. It is the most heavenly subtle blush of pink which warms lighter skin tones and gives fingers elegance and length, fighting trends of pop colours and glitters with classic beautiful feminine nails. 
The polish applies without fault, opaque and is seamless with 2 coats, it definitely needs a topcoat to add shine and depth.
Steal Magnolias is my favourite film....like ever! And Shelby is my most favourite bride ever, imagine having Dolly Parton give you a blow wave for your walk down the isle. In the movie Shelby (Julia Roberts) describes her wedding colours as 'Blush and Bashful' two tones of very different pink, one deep and one lighter and pastel, I would like to think that Essie's 'Lady Like' is Shelby's 'Blush'.

Essie is available from www.adorebeauty.com.au online and from Myer Stores Australia Wide


xxx Nella

Twitter @beautegazette
Google +  +Nella van veenendaal 
Bloglovin' HERE

Shelby R.I.P the best bride ever!

Related Posts Plugin for WordPress, Blogger...